Friday, May 23, 2014

Beach Sea Shell Souveneir Mosaic


This past weekend I went on vacation to Myrtle Beach in South Carolina in the Atlantic Breeze Oceania resort. We started collecting shells in the morning on the shore when I came up with this art project. I love elephants, I have a mild obsession with how adorable they are so when I started picking up these gray oyster shells, thinking of what I could possibly do with all of these shells we were picking up, I decided an elephant mosaic would be the perfect way to use these shells and remember this vacation.

Heres how you do it!
Materials:
  • Sea shells
  • A hammer
  • A Canvas Panel (meaning the canvas is not raised and stretched over wood but lying flat)
  • A pencil 
  • Mosaic Grout (I used Mosaic Mercantile Mosaic Grout white sanded, don't get the premixed kind, get the powdered one that you have to mix)
  • A painter's brush (the kind you use to paint walls)
  • Glue (I just used Elmer's glue)
Steps:
  1. Collect shells. 
    • Because I did an elephant I got a lot of oyster shells for the gray and then shells that weren't too rounded. 
    • The beautiful thing about making mosaics is that you can pick up all of the broken pieces nobody else wants.
  2. Develop your design on the canvas.
    • I drew the elephant outline with a pencil on the canvas panel.
  3. Break the shells.
    • I took a hammer to the sea shells and broke them into pieces.
  4. Fill the outline with shells.
  5. Glue the shells to the canvas
    • I took the lid off the glue and used a little crappy paint brush to paint the backs of the shells with glue.
  6. Fill the rest of the canvas with shells and glue them down,
  7. Mix the grout.
    • I took a measuring cup of water to add a little at a time.
    • I mixed it enough with a plastic spoon to where there is a thick consistency like concrete.
  8. Paint over the canvas with the grout.
    • Once the glue has dried paint over the shells with the grout using the painter's brush.
    • I just scooped a bit of grout on the brush at a time and covered as much of the shells and cracks as possible, don't worry about covering the shells.
  9. Let stand for 20 minutes, allowing the shells to set.
  10. Go over the shells with a wet sponge to get the grout off of them.
    • After I got the initial grout off I went over it again with a Q-tip to get the sand and grout off of the shells.
  11. Seal it with gloss.


Monday, August 12, 2013

The Spray Paint Stencil Canvas

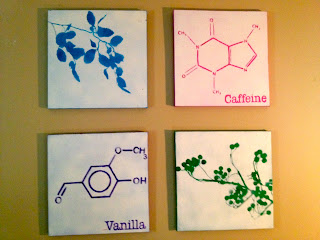
Four of the canvases that I bought were the same sized so I decided to block them in a group and create a similar motif. The images I selected go hand in hand with my love of nature and organic chemistry. You can choose whatever silhouette's you want to make your own.


The first thing I did was apply base coat colors. I chose the basic colors blue, green, purple, and pink, mainly because that is what I had. These paints were not the fancy acrylics I used before, instead they were run of the mill washable kid's paint so it took several coats to hide the picture that was on the canvas when I bought it.

I made my own stencils off of google (the process is more detailed out in my second post) and used adhesive spray to stick them onto the canvas. Then I sprayed a beige spray paint over the stencils. If you notice the paint job I did is a little uneven, if you are particular about that you can just simply spray more coats on. I wasn't too picky.

After the spray paint dried I peeled off the stencils with tweezers and my design was revealed.

The cool thing about using spray paint is that it gives a faded affect to the image in some areas, giving the painting more dimension.


The Sticker-Letter Canvas

This type of canvas art is probably the easiest because you don't have to make your own stencils, just go to the nearest craft store and buy a few packs of scrap booking letters!


I used one of my recycled canvases that I spray painted white. Then I found the quote that I wanted to use. I chose John 13:7 because throughout school and the other stresses in life it is a daily reminder to hold onto the fact that God has your back.

When selecting your quote I suggest tallying the amount of each letter you need so you know exactly how many packs of sticker letters to buy (I got away with three). Color or texture of the stickers do not matter because they are just stencils!

After that I stuck the stickers to the canvas, using a ruler and pencil to draw straight lines as a guide. I chose to place the stickers aligned to the left because it looks clean and I didn't have to worry about words being off-centered.

I used the same gift card technique that I used for my world atlas painting. The first paints I used were gray acrylic paint and white acrylic paint. I squeezed some paint out straight on the canvas and spread it around using an old gift card. Unfortunately the first time I did this I did not pay attention to the stickers and noticed some shifted, so after the gray dried I repositioned some of the stickers and painted over it with a red-pink color. It actually worked and gave the painting more dimension.

After the top coat dried I peeled the letters off under a light. Using the light I could see exactly where the stickers were, and since the paint was thick I outlined them with an exacto-knife and peeled the stickers off.

Once all the stickers are peeled off you get your final product!

The Basic Stencil Canvas


I designed this canvas using the basic stencil technique.

I already went through how to develop your own stencils from the internet, now I will tell you exactly what I did to accomplish this look.

First I painted one of my recycled canvases with a mixture of different green acrylic paints and white acrylic paint that I had. I actually squirted the paints directly onto the canvas in random areas and then used an old gift card to spread the paint around. The gift card technique gives the paint a nice imperfect texture that presents raised areas and bumps, perfect for my world atlas. I let the paint dry.

I then decided to make my world atlas mission themed. I am a Christian and world outreach is one of my passions so I wrote all over the base green color in a black sharpie pen verses about reaching out to the world. You can do the same with quotes or phrases.


What makes it really cool is that the picture has more meaning to you and is customized with your handwriting.

I attached my stencils to the canvas using pieces of painters tape folded over to make both sides sticky and I sponged on some dark gray paint with an old painters sponge I had. Then, before it dried, i lifted the stencils off with tweezers and threw them out.

Let it dry and there you have it, I nice customized picture of whatever you want.

Customizable Canvases


The first thing I did in preparation for my apartment was designing some wall art. I am big into painting and I love the unframed canvas looks, but canvas can be expensive!

Q: How did I get by the cost of canvases?
A: I went to a thrift store and kept my eyes peeled for already used canvases!

I found five canvases at Cracker Barrel, on sale for 75% off! Four of them were the exact same picture of pool balls in the shape of a heart, another one was an American eagle with a quote by FDR on it. I snatched those puppies up for less than five dollars total and decided to up-cycle them. I also found a nice sized canvas at a thrift store, again with a design already on it for a kids room with the ABCs. I bought it for basically nothing and added it to my collection of up-cycled canvases.

Once I got the canvases it was time to figure out what I wanted to do with them. I decided the quickest and easiest way to make some paintings on my own, without the fear of messing up or putting my artistic skills to the test, was to use stencils.

Here's the problem: Stencils can get expensive and you can't always find exactly what you want.
Solution: Make your own!

I went onto google, typed in what I wanted, for example, I wanted one of my canvases to be an atlas of the world (not necessarily geographically correct but you get the idea), so I searched for an image, large enough to print out without being pixelized and I printed it on card stock.

Here is a step by step process on how I accomplished this at the right size for the canvas.
1. Obtain the dimensions of the canvas
2. Search an image (for plants or animals I find it the easiest to include the word silhouette)
3. Select an image that is preferably in the thousands when it comes to image size, if its pixelized when it prints the image is too small, but thats okay because it will be a stencil!
4. This step needs to be separated depending on if your Mac or Windows (I happen to have a Mac)
    -Windows: open the image in Microsoft publisher, customize the page size to the size of your canvas
      when you print it out, it should print your image out in tiles
    -Mac: For some reason Publisher was not cooperating with printing in tiles so I purchased a desktop
     app called Mindcad Tiler for $4.99
     You will have to convert the image to a PDF first, which you can do for free at freepdfconvert.com
     Adjust the dimensions of the pdf to the dimensions of the canvas and print.
5. Cut out the stencils.
     -This is the most tedious part, I would recommend an exacto-knife or a small pair of sewing scissors.

Now, for prepping the canvases.

For one of the canvases I needed the base color to be white so I bought a cheap can of spray paint and painted it white. For the others I had different base colors in mind and used some left over paint from other projects to cover the old images.

Applying the stencils.

On some of the stencils there where a lot of fine lines so I sprayed the backs with adhesive spray and applied them on there. You can get adhesive spray at any craft store. Otherwise, I taped the stencil down with painters tape.

Painting over the stencils.

For four of the canvases I spray painted over the stencils which gave a nice fading effect to the image.
On the world map picture I sponged over the stencil.
-tip- when using card stock as a stencil, sponging works the best. Make sure there is not too much paint on the sponge, or it will bleed through the card stock.
On the canvas with a verse I used the sticker letter technique.

I will address in more detail each of the techniques for the different types of canvases in a separate post! These tips are just the basics for making a canvas your own! I hope they were useful!


Hi, my name is Tiffany, and this blog is for anyone who wants to decorate on a tight budget.
I am a Pharmacy Student in my first apartment and I love to decorate, customize, and personalize my space, but decorating on a budget can be difficult.

With my tips and tricks that I've learned you can quickly turn bare walls into personalized statements and turn a house (or apartment) into a home.

I hope you all enjoy my tips and can turn your living space into a fabulous personalized space!